The scent of hot cast iron and searing lean protein is the heartbeat of a high-performance kitchen. When you commit to Ground Turkey Prep, you are not just making dinner; you are managing a logistics chain of macronutrients designed to fuel a high-output lifestyle. Ground turkey is often unfairly maligned as the dry, flavorless cousin of beef, but that is a failure of infrastructure, not the ingredient. In its raw state, turkey is a high-moisture, low-fat canvas that requires precise thermal management to prevent it from becoming a desiccated pile of rubber. We are here to optimize that process. By mastering the Maillard reaction and controlling the evaporation of cellular water, we transform this lean bird into a savory, versatile foundation. This is about more than just heat; it is about the strategic application of fat, the aggressive layering of aromatics, and the mechanical agitation required to achieve a uniform crumble. Prepare to audit your current methods and upgrade your culinary hardware for maximum yield and peak sensory output.
THE DATA MATRIX
| Metric | Specification |
|---|---|
| Prep Time | 10 Minutes |
| Execution Time | 15 Minutes |
| Yield | 4-6 Servings |
| Complexity (1-10) | 3 |
| Estimated Cost per Serving | $1.75 – $2.25 |
THE GATHERS
Ingredient Protocol:
- 900g / 2 lbs Lean Ground Turkey (93/7 blend recommended)
- 30ml / 2 tbsp High-Smoke Point Oil (Avocado or Grapeseed)
- 150g / 1 cup Yellow Onion, finely minced
- 15g / 3 cloves Garlic, microplaned
- 10g / 2 tsp Kosher Salt
- 5g / 1 tsp Cracked Black Pepper
- 5g / 1 tsp Smoked Paprika
- 60ml / 0.25 cup Chicken Bone Broth (for deglazing)
Section A: Ingredient Quality Audit:
Sub-par raw materials will compromise your entire logistics chain. If your turkey appears grey or has a viscous slime on the surface, the bacterial load is too high; discard it immediately. If you find the meat is too wet (common in vacuum-sealed packaging), the excess moisture will steam the meat rather than sear it. To fix this, pat the protein dry with paper towels before it touches the pan. If your spices lack a piquant aroma, they are oxidized. Toast them in a dry pan for sixty seconds to infuse the oils back into the surface before adding them to the meat.
THE MASTERCLASS
1. Thermal Priming
Place your heavy-bottomed stainless steel skillet or saucier over medium-high heat. Add the oil and wait for it to shimmer. A cold pan is the enemy of protein structure; it leads to sticking and uneven cooking.
Pro Tip: Use an infrared thermometer to ensure the pan surface reaches 375 degrees Fahrenheit. This temperature triggers the Maillard reaction, creating the complex flavor molecules essential for lean meats.
2. The Initial Sear
Add the turkey to the pan in a single, flat disc. Do not break it up immediately. Let it sit undisturbed for three minutes to develop a deep brown crust.
Pro Tip: Use a digital scale to portion your meat before cooking. Consistency in mass ensures consistency in cook time. Leaving the meat intact initially mimics a steak sear, maximizing flavor development.
3. Mechanical Agitation
Use a bench scraper or a stiff wooden spatula to break the meat into uniform crumbles. This increases the surface area, allowing the heat to render any internal fats and cook the protein through.
Pro Tip: Mechanical agitation should be aggressive but controlled. Smaller crumbles provide a better mouthfeel in meal prep containers and allow spices to coat every fiber of the meat.
4. Aromatic Integration
Push the meat to the perimeter of the pan and add the onions and garlic to the center. Sauté until the onions are translucent and have begun to aerate the air with their sweetness.
Pro Tip: Adding aromatics halfway through prevents the garlic from burning while the meat sears. This staggered entry ensures the garlic remains fragrant rather than bitter.
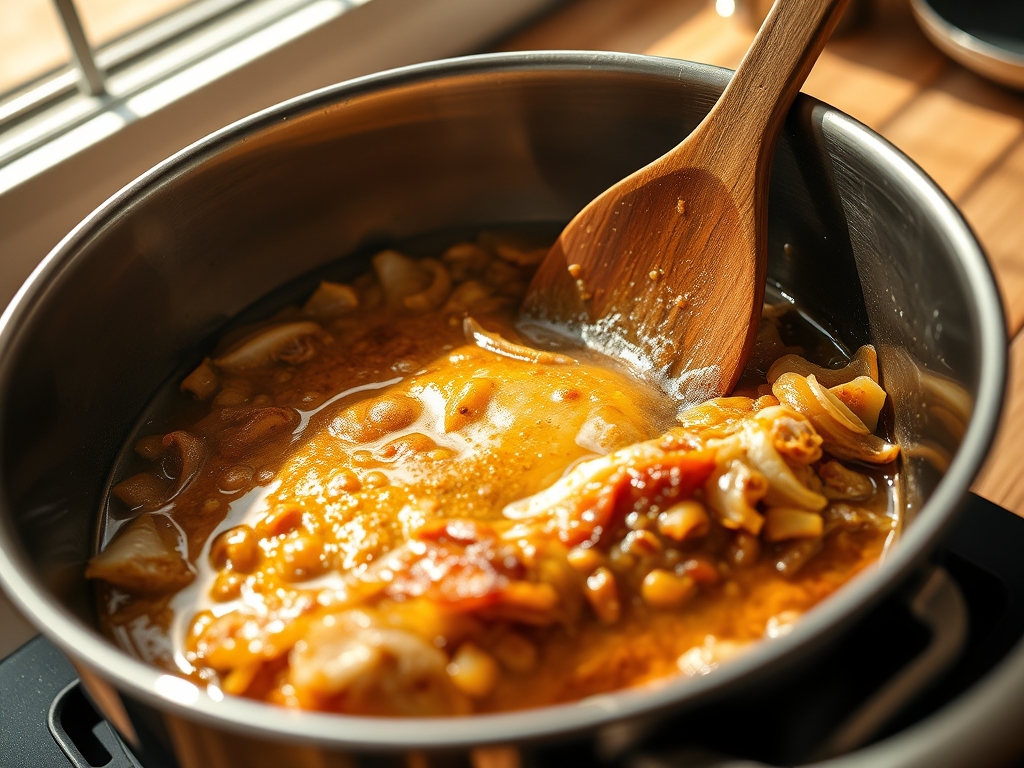
5. Deglaze and Emulsify
Pour the bone broth into the pan, using your spatula to scrape up the "fond" (the brown bits) stuck to the bottom. This process will deglaze the pan and create a light, savory jus.
Pro Tip: The liquid acts as a heat transfer medium, ensuring the turkey stays moist during storage. This step is vital for "logistics" because it prevents the meat from drying out during the reheating phase.
Section B: Prep & Timing Fault-Lines:
The most common failure in Ground Turkey Prep is "crowding the pan." If you dump 5 lbs of meat into a small skillet, the temperature drops, the meat releases its juices, and you end up boiling the turkey in its own grey liquid. To fix this, cook in batches. Another fault-line is the "carry-over cook." Remove the turkey from the heat when it hits 160 degrees Fahrenheit; the residual heat will bring it to the food-safe 165 degrees without turning it into sawdust.
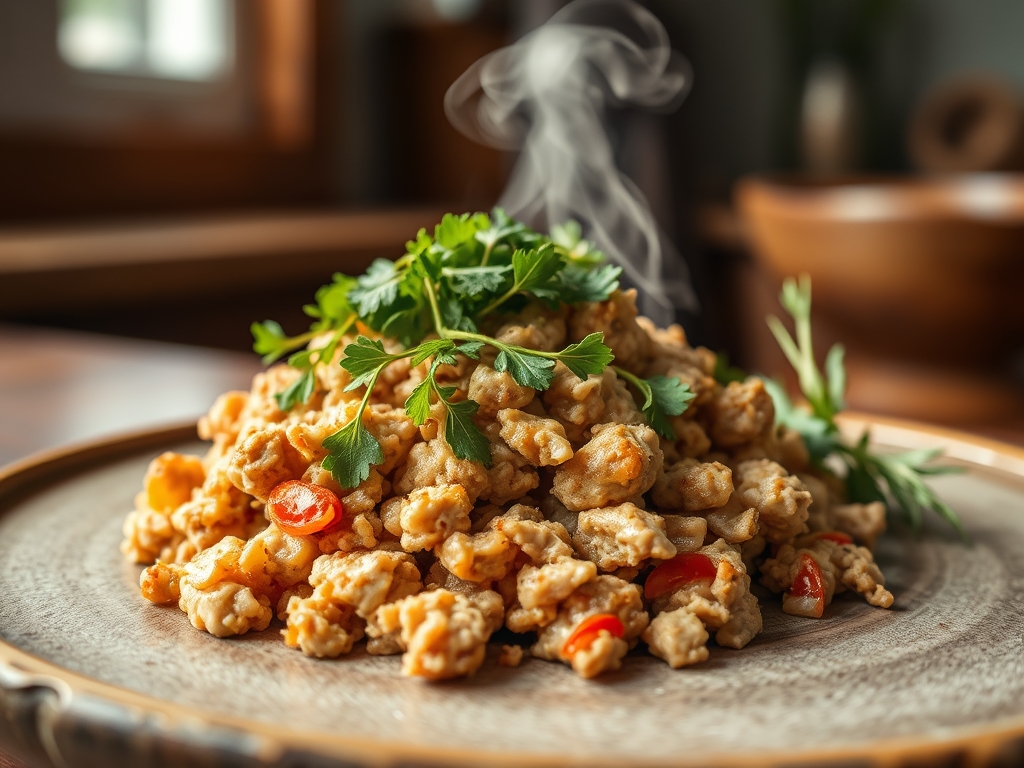
THE VISUAL SPECTRUM
Section C: Thermal & Visual Troubleshooting:
Analyze the Masterclass photo. You should see distinct, browned edges and a lack of "pooling" liquid. If your turkey looks pale and soggy, your heat was too low or your pan was too small. If the meat looks "pitted" or dry, you skipped the deglazing step. To fix a dull visual profile, add a splash of acid, like lime juice or apple cider vinegar, at the very end. This brightens the colors and cuts through the richness. If the texture is "mushy," you likely over-processed the meat in the pan; next time, leave larger chunks during the initial break-up phase to maintain structural integrity.
THE DEEP DIVE
Macro Nutrition Profile
A standard 4-ounce serving of this protocol yields approximately 220 calories, 26g of protein, 8g of fat, and 0g of carbohydrates. It is the gold standard for lean muscle maintenance. By controlling the oil input, you can further lean out the profile for strict cutting phases.
Dietary Swaps
- Vegan: Replace turkey with crumbled firm tofu or tempeh. Increase the smoked paprika and add a dash of liquid smoke to mimic the savory depth of poultry.
- Keto: Increase the fat content by using an 85/15 turkey blend and adding 15g of grass-fed butter during the final deglaze.
- GF: This protocol is naturally gluten-free. Ensure your bone broth is certified GF to avoid hidden thickeners.
Meal Prep & Reheating Science
When reheating, the goal is to avoid further denaturing the proteins. Use a microwave-safe glass container and add a teaspoon of water before heating. This creates a steam chamber that protects the molecular structure of the meat, preventing it from becoming tough. For the best results, reheat at 70 percent power to ensure even thermal distribution without scorching the outer edges.
THE KITCHEN TABLE
How do I prevent my turkey from being dry?
Focus on the deglazing step. By adding a small amount of broth at the end of the cook, you create a moisture barrier that coats the protein fibers, keeping them hydrated even after refrigeration and reheating.
Can I freeze this batch-cooked turkey?
Absolutely. Portion the cooked meat into airtight bags, removing as much oxygen as possible. It will maintain its structural integrity for up to three months. Thaw in the refrigerator for 24 hours before your intended consumption.
Why is my ground turkey sticking to the pan?
Your pan was likely not hot enough before the meat was introduced. Stainless steel requires a "Leidenfrost" state where the oil is shimmering. If it sticks, leave it alone; it will naturally release once the sear is complete.
What is the best way to add flavor without calories?
Utilize dry spices and aromatics aggressively. Smoked paprika, cumin, and onion powder provide massive sensory impact without altering the macro profile. A splash of hot sauce or vinegar at the end also adds "zing" without adding fat.