Stop settling for the soggy, uninspired bird that characterizes the average weeknight failure. We are here to talk about the structural integrity of the perfect Oven Roasted Chicken. This is not just dinner; it is an exercise in conductive thermal flux and the strategic manipulation of amino acids. Imagine the kitchen air thick with the scent of rendered subcutaneous fat and the sharp, piquant aroma of cracked peppercorns. You are aiming for a skin so crisp it shatters like glass, protecting a core of meat that remains impossibly succulent. Most home cooks treat the oven as a black box where moisture goes to die, but we treat it as a precision instrument. We are optimizing for the Maillard reaction, that glorious chemical marriage between sugars and proteins that produces the deep mahogany crust of your dreams. Every degree of heat and every gram of salt serves a purpose in this culinary architecture. If you are ready to stop guessing and start engineering, let us audit your process and rebuild it from the foundation up.
THE DATA MATRIX
| Metric | Specification |
|---|---|
| Prep Time | 20 Minutes (Excluding Dry Brine) |
| Execution Time | 65 to 75 Minutes |
| Yield | 4 to 6 Servings |
| Complexity (1-10) | 4 |
| Estimated Cost per Serving | $3.50 – $5.00 |
THE GATHERS
Ingredient Protocol:
- 1 Whole Chicken (Heritage or Air-Chilled) / 1.8kg to 2.2kg
- Kosher Salt / 15g to 20g (approx. 1.5 to 2 tablespoons)
- Unsalted Butter (Room Temperature) / 115g / 0.5 cup
- Fresh Rosemary and Thyme / 15g / 0.5 oz
- Garlic Cloves (Smashed) / 4 to 6 units
- Lemon (Halved) / 1 unit
- Black Peppercorns (Coarsely Cracked) / 5g / 1 teaspoon
- Dry White Wine (for deglazing) / 120ml / 0.5 cup
Section A: Ingredient Quality Audit:
The primary failure point in most poultry infrastructure is the "water-chilled" bird. These specimens are injected with a saline solution that bloats the weight and ruins the skin's ability to crisp. If your chicken feels slimy or sits in a pool of pink liquid, it is a sub-par raw material. The fix is a rigorous surface desiccation. You must pat the bird dry with lint-free towels and let it air-dry in the refrigerator for at least four hours. If your herbs are wilted and lack that piquant punch, do not use them. Low-quality fats will also smoke prematurely; ensure your butter is high-quality European style with a higher fat content to ensure it can infuse the meat without breaking down into acrid compounds.
THE MASTERCLASS
1. The Surface Preparation and Brine
Begin by placing the bird on a clean workstation. Use a digital scale to measure your salt precisely; 1% of the bird's weight is the golden ratio. Liberally season the cavity and the exterior. Use a bench scraper to clear any debris from your board as you work to maintain a sterile environment.
Pro Tip: Salt acts as a denaturant. It breaks down the tightly wound muscle proteins, allowing them to retain more moisture during the thermal transition. This is the difference between a dry breast and a juicy one.
2. The Aromatics and Trussing
Stuff the cavity with your lemon halves, smashed garlic, and herbs. These will infuse the meat from the inside out. Tie the legs together with kitchen twine to ensure a compact shape. This reduces the surface area-to-volume ratio, preventing the delicate breast meat from overcooking before the thighs are safe.
Pro Tip: Use a saucier to melt a small portion of butter with the herbs beforehand if you want a more intense flavor profile. A compact bird roasts more evenly because it minimizes the turbulent airflow around the extremities.
3. The Thermal Application
Preheat your oven to 218C / 425F. Place the chicken in a heavy-bottomed roasting pan. Slide it into the center rack where the conductive thermal flux is most stable. The high initial heat triggers the render process, liquefying the fat so it can baste the skin.
Pro Tip: Use a high-quality probe thermometer. Pull the bird when the thickest part of the breast hits 68C / 155F. Carryover cooking will bring it to the FDA-recommended 74C / 165F while the bird rests.
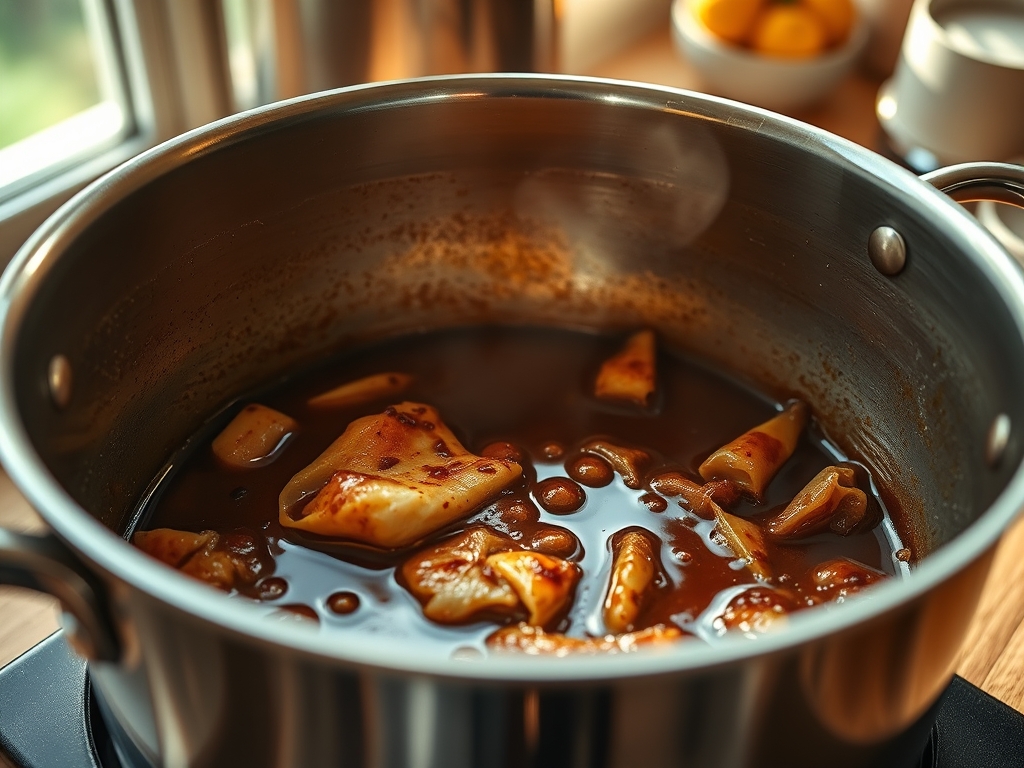
4. The Deglaze and Finish
Once the bird is removed and resting on a warm platter, place the roasting pan over a burner. Pour in your white wine to deglaze the fond (the brown bits stuck to the bottom). Scrape vigorously to capture those concentrated flavors.
Pro Tip: This is where you create a viscous jus. The wine acidity cuts through the heavy fats, balancing the palate and providing a sophisticated finish to the plate.
Section B: Prep & Timing Fault-Lines:
The most common human error is the "Cold Start." Taking a chicken directly from a 3C refrigerator and thrusting it into a 218C oven creates a massive thermal shock. The exterior will burn before the interior even begins to warm. Allow the bird to temper at room temperature for 30 to 45 minutes. Another fault-line is the "Peeking Protocol." Every time you open the oven door, you lose approximately 25 degrees of ambient heat, extending the cook time and drying out the meat. Trust your external probe thermometer and keep the door shut.
THE VISUAL SPECTRUM
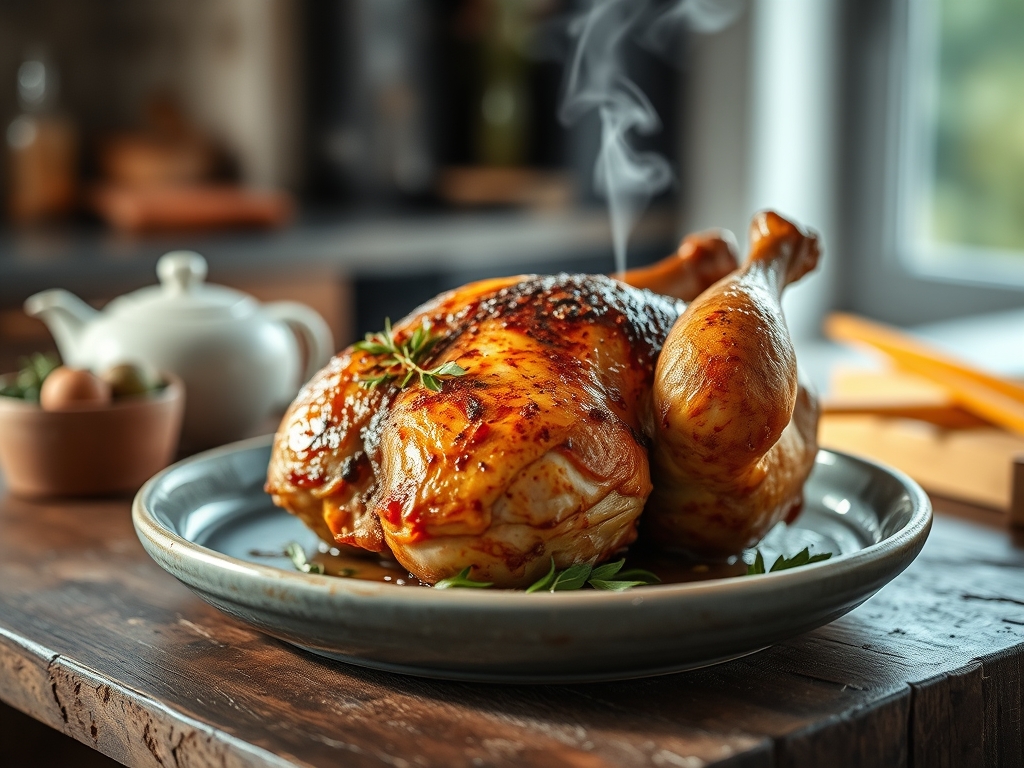
Section C: Thermal & Visual Troubleshooting:
Referencing the Masterclass photo above, look for the "Golden Hour" hue. If your bird looks pale and anemic, your oven temperature was likely too low, or you had too much moisture in the pan. If the skin is dark but the meat is raw, your sugar-to-fat ratio in the rub was too high. The photo shows a uniform, mahogany crust with no blackened spots; this indicates even heat distribution. If you see "leaking" juices that are red rather than clear, the bird has not reached the necessary internal temperature to coagulate the proteins. Finally, if the skin is wrinkled rather than taut, you skipped the air-drying phase. The visual cue for a perfect roast is a skin that looks like polished wood and stays rigid when pressed.
THE DEEP DIVE
Macro Nutrition Profile:
A standard 150g serving of Oven Roasted Chicken provides approximately 350 calories, 35g of protein, and 22g of fat. It is a zero-carb powerhouse, making it the ultimate anchor for various dietary frameworks.
Dietary Swaps:
- Vegan: This infrastructure can be applied to a whole roasted cauliflower head. Replace butter with a high-smoke point avocado oil and use vegetable stock for the deglaze.
- Keto/GF: This recipe is naturally compliant. Avoid adding flour to the pan drippings; use a cold butter whisk-in (monter au beurre) to thicken the sauce instead.
Meal Prep & Reheating Science:
To maintain the molecular structure when reheating, avoid the microwave. The microwave agitates water molecules, causing them to steam the meat from the inside and turning the skin into rubber. Instead, reheat in a 150C / 300F oven with a splash of water in the pan, covered with foil, to gently rehydrate the fibers without overcooking.
THE KITCHEN TABLE
Why is my chicken skin rubbery?
This is caused by trapped moisture. If you do not dry the skin thoroughly before roasting, the water must evaporate before the fat can render. This delays the crisping process until the meat is already overcooked.
Can I roast the chicken on a bed of vegetables?
Yes, but be warned. The vegetables release moisture, creating a localized steam environment. This can lead to soggy skin on the bottom of the bird. Use a roasting rack for maximum airflow if you want total crispness.
Do I really need to let the chicken rest?
Absolutely. Resting allows the muscle fibers to relax and reabsorb the juices. If you cut it immediately, the internal pressure will force all that liquid onto the cutting board, leaving you with dry meat.
What is the best way to get flavor under the skin?
Carefully separate the skin from the breast meat using your fingers or a spoon. Insert a compound butter mixture directly onto the meat. This ensures the seasoning penetrates the muscle rather than just sitting on the surface.