Listen to the sound of the structural collapse. That rhythmic, staccato crackle emanating from the cast iron is the sound of the Maillard reaction entering its final, glorious phase. We are not merely cooking; we are conducting a high-velocity thermal intervention. Most home cooks approach the stove with a timid heart and a low flame, resulting in a protein that is more "steamed sponge" than "culinary masterpiece." That ends today. The 10 Minute Salmon Searing protocol is about aggressive heat management and the precise timing of lipid rendering. When the cold flesh hits the shimmering oil, the goal is an immediate, sacrificial crust that protects the succulent, translucent interior. You want a surface that shatters like sugar glass under a fork, giving way to a center that remains buttery and barely set. This is the intersection of fluid dynamics and organic chemistry. We are here to optimize every second of the countdown. Grab your apron and calibrate your senses; the audit of your kitchen infrastructure begins now.
THE DATA MATRIX
| Metric | Specification |
|---|---|
| Prep Time | 4 Minutes |
| Execution Time | 6 Minutes |
| Yield | 2 Servings |
| Complexity (1-10) | 4 |
| Estimated Cost per Serving | $12.00 – $15.00 |
THE GATHERS
Ingredient Protocol:
- 2 Center-cut Salmon Fillets (approx. 340g / 12 oz)
- 30ml / 2 tbsp High-Smoke Point Oil (Avocado or Grapeseed)
- 15g / 1 tbsp Unsalted European-style Butter
- 5g / 1 tsp Flaky Sea Salt
- 2g / 0.5 tsp Freshly Cracked Black Peppercorns
- 1 Lemon (Zested and halved)
- 2 Sprigs Fresh Thyme (to infuse the lipids)
Section A: Ingredient Quality Audit:
If your raw material feels "tacky" or smells like the underside of a pier, your audit has failed before the heat is applied. Low-quality, previously frozen salmon often suffers from cellular rupture, leading to excessive moisture leakage during the sear. To fix this, perform a "Dry-Brine Intervention." Dust the fillets with salt and let them sit uncovered in the refrigerator for 20 minutes; this draws out surface moisture and tightens the protein structure. If your butter is low-fat or high-moisture, it will sputter and "break" rather than brown. Always opt for high-fat European-style butter to ensure a viscous, nutty base for your final baste.
THE MASTERCLASS

1. The Surface Dehydration Phase
The enemy of the 10 Minute Salmon Searing protocol is moisture. Use a heavy-duty paper towel to aggressively pat the fillets dry until the skin feels like parchment. Use a bench scraper to clear your workstation of any residual water droplets. A dry surface ensures that energy is spent on browning rather than evaporating water.
Pro Tip: Use a digital scale to ensure your fillets are of equal mass. This ensures thermal equilibrium, meaning both pieces reach the target internal temperature simultaneously.
2. Thermal Priming
Place your cast iron or heavy stainless steel pan over high heat. Add the oil and wait for the first wisps of blue smoke. This indicates the oil has reached its viscosity limit and is ready to receive the protein. Do not crowd the pan; airflow is essential for steam dissipation.
Pro Tip: Use an infrared thermometer to verify the pan surface has reached 425 degrees Fahrenheit (218 Celsius). Professional-grade heat management requires data, not guesswork.
3. The Initial Impact and Compression
Place the salmon skin-side down. Immediately apply light pressure with a flexible fish spatula for 30 seconds. This prevents the natural muscle fibers from curling, ensuring 100 percent surface-to-pan contact for a uniform render of the subcutaneous fat.
Pro Tip: A heavy saucier or a dedicated kitchen weight can be used to maintain even pressure, ensuring the skin transforms into a crisp, savory wafer.
4. The Aromatic Butter Baste
Reduce heat to medium-high. Flip the fish once the skin is golden and releases naturally from the pan. Drop in the butter, thyme, and lemon zest. As the butter begins to foam and aerate, tilt the pan and use a large spoon to bathe the skin side with the hot, flavored fat.
Pro Tip: This technique, known as "arroser," uses the butter as a heat transfer medium to finish the interior gently while adding a piquant, nutty depth to the crust.
5. The Rest and Residual Carry-over
Remove the salmon when the internal temperature hits 125 degrees Fahrenheit (52 Celsius). Place it on a wire rack, not a flat plate, to prevent the bottom from steaming and losing its crunch. Let it rest for two minutes.
Pro Tip: Residual heat will carry the internal temperature up to a perfect 130-135 degrees. Use a digital probe thermometer to track this "carry-over" cooking phase with precision.
Section B: Prep & Timing Fault-Lines:
The most common human error is the "Panic Flip." If the fish sticks, it is not ready. The protein will naturally release once the Maillard reaction has structurally reinforced the surface. Another fault-line is "Thermal Shock," taking the fish directly from a 35-degree fridge to a 450-degree pan. This causes the exterior to overcook before the center even begins to warm. Allow the fillets to temper at room temperature for 15 minutes prior to execution.
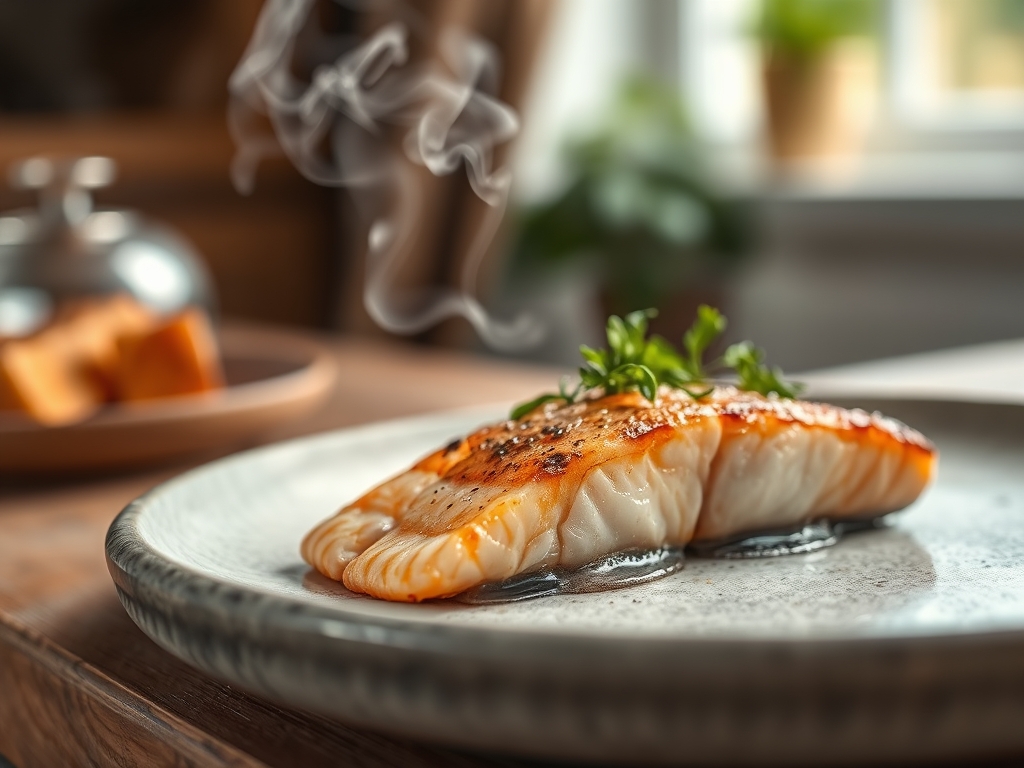
THE VISUAL SPECTRUM
Section C: Thermal & Visual Troubleshooting:
Look at the Masterclass photo above. Notice the "Albumin Leakage," those white beads of protein? That is a sign of overcooking or excessive heat. If you see this, reduce your flame immediately. The skin should be a deep, mahogany brown, not black. If the color is dull, your pan was likely too cold, resulting in a "boiled" appearance. To fix a lack of luster, deglaze the pan with a splash of white wine or lemon juice at the very end and swirl in a cold knob of butter to create a glossy, emulsified lacquer to pour over the finished product.
THE DEEP DIVE
Macro Nutrition Profile
A single serving of this protocol provides approximately 35g of high-bioavailability protein and 22g of heart-healthy fats, primarily Omega-3 fatty acids. Total caloric load sits around 380-420 calories, depending on the precision of your butter basting.
Dietary Swaps
- Vegan: Replace salmon with a "Lion's Mane Mushroom" steak. Use vegan butter and follow the same searing times to achieve a similar fibrous texture.
- Keto: This recipe is naturally Keto-compliant. Increase the butter volume for higher fat macros.
- GF: Naturally gluten-free. Ensure your "high-heat oil" is not a blend containing grain-based additives.
Meal Prep & Reheating Science
To maintain molecular structure when reheating, avoid the microwave at all costs. The microwave agitates water molecules, turning your crisp skin into rubber. Instead, use a toaster oven at 300 degrees Fahrenheit for 5 minutes. This gently re-activates the fats without tightening the protein fibers into a dry, "fishy" mess.
THE KITCHEN TABLE
Why is my salmon skin soggy?
You likely failed the dehydration phase or crowded the pan. Excess moisture creates steam, which prevents the skin from reaching the 300-degree threshold required for the Maillard reaction. Always pat dry and use high heat.
Can I use frozen salmon for this?
Yes, but you must thaw it completely in the refrigerator. Use the dry-brine method mentioned in the Quality Audit to stabilize the moisture levels, as frozen fish tends to release more liquid during the render process.
What oil is best for high-heat searing?
Avoid extra virgin olive oil; its smoke point is too low. Use avocado oil or grapeseed oil. These fats remain stable at high temperatures, preventing the development of bitter, acrid flavors during your 10 Minute Salmon Searing.
How do I know when the fish is done without a thermometer?
Press the side of the fillet with a fork. If the "flakes" begin to separate easily but the center still looks slightly translucent, you have achieved the optimal thermal finish. Remember, the fish continues to cook while resting.